Hello everyone! So I stumbled upon a recipe last weekend and I wanted to try it but the amount of ingredients it called for was outrageous. I live on a budget and I always try to think of ways to cook for less. So I hit the fridge and the cabinets and I was able to tweak the recipe and it was a SUCCESS!!!
Some of you have heard about the recipe already so here it goes...
BUFFALO CHICKEN MAC & CHEESE
2-3 Boneless Chicken Breasts
2 tbsp Curry Powder
2 tbsp Garlic Powder
1 tbsp Black Pepper
1 tbsp Salt
flour
cooking oil
frying pan
1/2 box of spiral noodles (rotini)
1/2 block of Velveeta Cheese (large block)
1/4 cup of milk
2 tbsp butter
1/4 cup Texas Pete hot sauce
Season chicken breasts with above seasonings. Coat them with flour and fry whole in frying pan with cooking oil (about 1 inch deep). While chicken is cooking boil noodles in salted water. When chicken is done allow to cool to retain juices. Once chicken is cool cut in small pieces set aside. Remove noodles from water and drain. Place butter in pot that noodles were cooking in. Cut cheese in blocks and add to pot with butter. On low heat add milk and keep stirring unitl cheese has melted into a sauce. Add hot sauce.
Place noodles in 8x8 baking pan add chicken. Once well mixed pour cheese mix over and bake for 30 min.
Enjoy!
Sunday, April 25, 2010

Sunday, April 18, 2010
Fried Chicken- Rachael Ray Mag
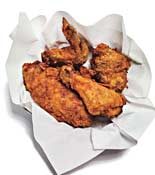
Everyone that knows me knows that I adore Rachael Ray! So in the latest issue (May 2010) there is an article about Southern Fried Chicken. Now the article isn't massive so it doesn't have a full page spread but it stuck out like a sore thumb to me. I went to the website to see this recipe because it only had a web address in the mag and here it is! The pic looks so "delish" (per Rach) So I thought I'd share with you guys!
I haven't tried it yet but it's def on the agenda...If you try it first PLEASE let me know!
Smooches, Infinity
Southern Fried Chicken by Gerry Mims courtesy of Rachael Ray Mag
Lifelong Mississippian Gerry Mims and his family have eaten a lot of fried chicken. But surprisingly, he didn’t have a recipe his family could call its own. At least until recently, when his son Ben created this Worcestershire-spiked version that has a great kick to it. Rach's take? "Chicken cutlets were a staple of my young life, but I don’t think I made a deep-fried chicken until this past year, when I wrote a spicy curry fried chicken recipe. My husband has since become such a huge fan that I have written six different fried chicken recipes in the last six months, including my latest: fried chicken sliders."

4 Servings Prep 15 min plus Marinating Cook 35 min
I haven't tried it yet but it's def on the agenda...If you try it first PLEASE let me know!
Smooches, Infinity
Southern Fried Chicken by Gerry Mims courtesy of Rachael Ray Mag
Lifelong Mississippian Gerry Mims and his family have eaten a lot of fried chicken. But surprisingly, he didn’t have a recipe his family could call its own. At least until recently, when his son Ben created this Worcestershire-spiked version that has a great kick to it. Rach's take? "Chicken cutlets were a staple of my young life, but I don’t think I made a deep-fried chicken until this past year, when I wrote a spicy curry fried chicken recipe. My husband has since become such a huge fan that I have written six different fried chicken recipes in the last six months, including my latest: fried chicken sliders."
4 Servings Prep 15 min plus Marinating Cook 35 min
INGREDIENTS:
- 2 cups buttermilk
- 1/3 cup Worcestershire sauce
- 1/4 cup hot pepper sauce
- One 3- to 4-pound chicken, cut into 8 pieces
- 2 cups flour
- 2 tablespoons seasoned salt, such as Lawry’s
- 1 tablespoon pepper
- 3 cups vegetable shortening
DIRECTIONS:
In a large bowl, combine the buttermilk, Worcestershire sauce and hot sauce. Add the chicken and turn to coat; cover and refrigerate for 4 hours or overnight.
Bring the marinated chicken to room temperature. In a 1-gallon resealable plastic bag or large paper bag, combine the flour, seasoned salt and pepper. Remove the chicken from the marinade, shaking off any excess. Working in 2 batches, place in the seasoned flour; shake until well coated. Place on a baking sheet and let sit for 10 minutes.
Meanwhile, in a dutch oven, heat the vegetable shortening over medium-high heat until it registers 315° on a deep-fry thermometer. Add the chicken thighs and legs and cook, turning once, until golden and the internal temperature registers 160° on an instant-read thermometer, about 15 minutes; transfer to a rack to drain. Repeat with the breasts and wings.
Saturday, April 17, 2010
Salmon Croquettes
Happy Saturday Lovelies,
I thought this post would be something simple and inexpensive. I grew up eating this as a child and back then I would only eat it with ketchup and pork n beans now Ive grown to appreciate what I thought was poor people's food. These salmon croquettes or salmon patties as friends call them are wonderful and they are very quick to prepare!

I hope you all enjoy them!
Infinity
Ingredients
1 can of Pink Salmon (very inexpensive like 1.49/can)
1 small onion diced (add as much as you like)
1 large egg
1 tablespoon of flour (for binding)
Cooking Oil (I prefer Canola)
Directions
When you open the Pink Salmon there is a bone in it so its best to pour it in a bowl and remove the bones gently because they are softened so you actually don't have to remove them. ( I remove them because I despise the texture) Once removed crumble salmon with hands and add diced onion, egg, and flour.(you also may want to add some salt & pepper here) Egg is going to make salmon mixture wet but flour is added to bind together so it isn't too wet. It should be good enough to make a "pattie" about the size of a hamburger or smaller.
Heat oil in a shallow frying pan about 1/2 inch or less of oil in the pan. (not too much because you are pan frying them not deep frying) Oil should be relatively hot but not too hot when frying because you don't want them to burn. Cook until brown and then flip. (about 2-3 min)
Serve Hot or Room Temp with White/Yellow rice and Baked Beans.
*for Supa & Angie with luv....
I thought this post would be something simple and inexpensive. I grew up eating this as a child and back then I would only eat it with ketchup and pork n beans now Ive grown to appreciate what I thought was poor people's food. These salmon croquettes or salmon patties as friends call them are wonderful and they are very quick to prepare!

I hope you all enjoy them!
Infinity
Ingredients
1 can of Pink Salmon (very inexpensive like 1.49/can)
1 small onion diced (add as much as you like)
1 large egg
1 tablespoon of flour (for binding)
Cooking Oil (I prefer Canola)
Directions
When you open the Pink Salmon there is a bone in it so its best to pour it in a bowl and remove the bones gently because they are softened so you actually don't have to remove them. ( I remove them because I despise the texture) Once removed crumble salmon with hands and add diced onion, egg, and flour.(you also may want to add some salt & pepper here) Egg is going to make salmon mixture wet but flour is added to bind together so it isn't too wet. It should be good enough to make a "pattie" about the size of a hamburger or smaller.
Heat oil in a shallow frying pan about 1/2 inch or less of oil in the pan. (not too much because you are pan frying them not deep frying) Oil should be relatively hot but not too hot when frying because you don't want them to burn. Cook until brown and then flip. (about 2-3 min)
Serve Hot or Room Temp with White/Yellow rice and Baked Beans.
*for Supa & Angie with luv....
Sunday, April 11, 2010
Lost Time
So yeah I'm making up for lost time...
School is almost over and graduation is slowly approaching...I'd be lying if I said I wasn't excited about graduation because I am.
As this time approaches I will be with my family so I wanted to give you guys something that I grew up eating and that I still love to this very day: Garlic Rice.
My Granny made it for me and I do not know where she got the recipe from b/c she's the only one who makes it in the family (besides me of course)
I hope you guys enjoy it as much as I do...
Bon Apetite'
Garlic Rice
2 cups Uncle Ben's Rice
1-2 cans of Campbell's Consomme Beef
4 garlic cloves sliced
a few pats of butter
*Pour the rice in the bottom of a 8x8 baking dish.
*Add the sliced garlic cloves
*Pour in 1 can of Campbell's add a second if it barely covers
*Put in butter last
*Cover and bake @ 350 for about 30-45 min (or until done)
This rice can be served with chicken or pork.
School is almost over and graduation is slowly approaching...I'd be lying if I said I wasn't excited about graduation because I am.
As this time approaches I will be with my family so I wanted to give you guys something that I grew up eating and that I still love to this very day: Garlic Rice.
My Granny made it for me and I do not know where she got the recipe from b/c she's the only one who makes it in the family (besides me of course)
I hope you guys enjoy it as much as I do...
Bon Apetite'
Garlic Rice
2 cups Uncle Ben's Rice
1-2 cans of Campbell's Consomme Beef
4 garlic cloves sliced
a few pats of butter
*Pour the rice in the bottom of a 8x8 baking dish.
*Add the sliced garlic cloves
*Pour in 1 can of Campbell's add a second if it barely covers
*Put in butter last
*Cover and bake @ 350 for about 30-45 min (or until done)
This rice can be served with chicken or pork.
Caramel Cake
So a few weeks ago I got a hankering for something different...I wanted something sweet but didn't know where to begin. So I visited trusty ol' food network and I holla'd @ my girl Paula Deen! (I just lover her!!!!) So I made Bobby's Caramel Cake.
This cake was very good and the flavor was phenomenal! The down side is it is extremely rich and I'm not very big on sweets after about a day or so, so ultimately it got thrown out. (wish you guys were here to indulge)
So here it is, if you try it be warned the icing is hella heavy!

This cake was very good and the flavor was phenomenal! The down side is it is extremely rich and I'm not very big on sweets after about a day or so, so ultimately it got thrown out. (wish you guys were here to indulge)
So here it is, if you try it be warned the icing is hella heavy!
- Prep Time:
- 25 min
- Inactive Prep Time:
- --
- Cook Time:
- 35 min
- Level:
- Easy
- Serves:
- 16 to 20 servings
Ingredients
For the cake:
- 1 cup (2 sticks) butter, at room temperature
- 2 cups granulated sugar
- 4 eggs
- 3 cups sifted self-rising flour
- 1 cup milk
- 1 teaspoon pure vanilla extract
For the filling:
- 1 cup (2 sticks) butter
- 2 cups packed light brown sugar
- 1/4 cup milk
- 1 teaspoon pure vanilla extract
For the frosting:
- 1/2 cup (1 stick) butter
- 1 cup packed dark brown sugar
- 1/3 cup heavy cream, or more if needed
- 1 (16-ounce) box confectioners' sugar
- 1 teaspoon pure vanilla extract
- 1 cup chopped nuts, optional
Directions
For the cake:
Preheat oven to 350 degrees F. Grease and flour 3 (9-inch) cake pans.
Using an electric mixer, cream butter until fluffy. Add granulated sugar and continue to cream well for 6 to 8 minutes. Add eggs 1 at a time, beating well after each addition. Add flour and milk alternately to creamed mixture, beginning and ending with flour. Add vanilla and continue to beat until just mixed. Divide batter equally among prepared pans. Level batter in each pan by holding pan 3 or 4-inches above counter dropping it flat onto counter. Do this several times to release air bubbles and assure you of a more level cake. Bake for 25 minutes or until golden brown.
For the filling:
While cake is baking, in a saucepan, combine butter, brown sugar, and milk. Cook and stir over medium heat for 3 to 5 minutes. Remove from heat and stir in vanilla.
Remove cake layers from oven and allow cake to remain in pans as you prepare to stack and fill. Remove first layer and invert onto cake plate. Pierce cake layer with a toothpick over entire surface. Spread 1/3 of filling mixture on cake layer. Top with second layer, repeat process. Top with last layer and repeat process again.
*Cook's Note: As I stack layers together, I stick them with toothpicks to prevent cake from shifting.
For the frosting:
Melt butter in a saucepan over medium heat and stir in brown sugar and cream. Bring to a boil, and transfer to a mixing bowl. Add confectioners' sugar and vanilla. Beat with a handheld electric mixer until it reaches a spreading consistency. At this time it may be necessary to add a tablespoon of heavy cream, or more, if frosting gets too thick. Just be sure to add cream is small amounts because you can always "add to", but you can't take away. Frost cake and sprinkle top with chopped nuts, if desired.
Saturday, January 30, 2010
Chicken & Dumplings
I've been gone for a min now Im back with the jump off...
LOL I have def been gone for a min... school has resumed and I am teaching everyday as well as working full time!! Somebody say a prayer for me bc 4 hours of sleep each night is ROUGH!!!
Anywho... I come bearing a new post something that will keep you warm and stick to your ribs on a cold winter's day!
Chicken & Dumplings or as I was raised Chicken Pastry
you will begin this dish by choosing the chicken pieces of your choice. (although i love breast meat the thigh meat has more flavor)
4-6 chicken thighs
2 -3 cans chicken broth
water
salt
pepper
frozen pastry strips, egg noodles, or dumplings
boil the chicken thighs in the chicken broth and water until the meat falls off the bone. remove all bones & skin. (the water will evaporate so you may want to have an extra can of chicken broth to add back to the pot once the chicken is done to flavor your pastry)
add pastry or noodles to meat & stock cook until
season to taste
enjoy with some hot cornbread!
Enjoy!!!!!
LOL I have def been gone for a min... school has resumed and I am teaching everyday as well as working full time!! Somebody say a prayer for me bc 4 hours of sleep each night is ROUGH!!!
Anywho... I come bearing a new post something that will keep you warm and stick to your ribs on a cold winter's day!
Chicken & Dumplings or as I was raised Chicken Pastry
you will begin this dish by choosing the chicken pieces of your choice. (although i love breast meat the thigh meat has more flavor)
4-6 chicken thighs
2 -3 cans chicken broth
water
salt
pepper
frozen pastry strips, egg noodles, or dumplings
boil the chicken thighs in the chicken broth and water until the meat falls off the bone. remove all bones & skin. (the water will evaporate so you may want to have an extra can of chicken broth to add back to the pot once the chicken is done to flavor your pastry)
add pastry or noodles to meat & stock cook until
season to taste
enjoy with some hot cornbread!
Enjoy!!!!!
Sunday, January 3, 2010
Happy New Year!
Happy New Year all! I know it's been a few weeks since I've posted anything but just like the rest of America I've been trying to get through the holidays.
It's finally over and I can say I had a wonderful holiday with loved ones as I hope you did as well.
First post of the New Year...
I'm going to repost my Fod for the Soul posts from the http://www.1081creations.com/ blog.
There are also going to be some newbies as well!
Enjoy!
Rice Broccoli & Cheese Casserole
1 Onion Diced
3 Tablespoons Butter
1 Can Cream of Chicken Soup
½ Cup of Milk
1 10oz. package of Frozen Broccoli
½ lb. Velveeta Cheese (cut in cubes)
1 ½ Cup of Cooked Rice
Sauté onion in butter, then combine with other ingredients. In a greased 1 ½ quart casserole dish bake @ 350 for 30 minutes
Christine’s Beef & Vegetable Soup
1 pound of Stew Beef Meat (beef tips)
1 can of whole kernel corn
2 cans of mixed vegetables
1 can of baby lima beans
2 cans of stewed tomatoes (garlic, basil, & oregano by DelMonte or Dole)
¼ of a small cabbage cut up
*(feel free to add any canned or frozen veggies you like but remember frozen veggies may take longer to cook than canned)
Boil beef for about 1 hour on med/high heat until tender. Season beef during this time with salt, pepper, and garlic. Turn down heat and add canned veggies, tomatoes, and cabbage and allow to cook until cabbage is done. Once cabbage is done turn off heat and allow to simmer over remaining heat. Serve while hot!
Browni Bites
Ingredients
• 1/2 cup butter
• 1 cup white sugar
• 2 eggs
• 1 teaspoon vanilla extract
• 1/3 cup unsweetened cocoa powder
• 1/2 cup self rising flour
*if you like you can add 1/2 to 1 cup of pecans, walnuts, or cashews.
DIRECTIONS
1. Preheat oven to 350 degrees F (175 degrees C). Spray an 8 inch square pan or mini muffin pan with Bakers Joy or Crisco with flour.
2. In a large saucepan, melt 1/2 cup butter. Remove from heat, and stir in sugar, eggs, and 1 teaspoon vanilla. Beat in 1/3 cup cocoa, 1/2 cup flour, salt, and baking powder. Spread batter into prepared pan.
3. Bake in preheated oven for 25 to 30 minutes. Do not overcook.
Chew Bread
1 stick butter
1 box brown sugar
2 eggs
2 c. self-rising flour
1 tsp. vanilla
1 c. chopped nuts (optional but pecans work best)
Melt butter and add sugar. Remove from heat. Add eggs, one at a time, beating after each addition. Add flour, one cup at a time. Add vanilla and nuts. Bake in 13x9x2 * inch greased pan at 350 degrees for 20-30 minutes.
Use a toothpick to test, when it comes out clean its done.
*if you want thicker bars you can use an 8x8 baking dish
Blueberry Pound Cake
1 box butter flavored yellow cake mix
1 8oz package cream cheese
1/2 cup vegetable oil
3 eggs
2 cups blueberries (add 2 Tblsp. flour)
Preheat oven to 325. Lightly grease and flour a 10" tube pan. Combine cake mix, cream cheese, oil and eggs. Beat until smooth. Gently fold lin blueberries. Spoon into cake pan and bake for about 1 hour.
Cream Cheese Icing
One 8 ounce package of cream cheese, softened
1/4 c. butter, softened
2 tsp. vanilla
1 lb. pkg. powdered sugar
Beat together cream cheese and butter until smooth. Blend in vanilla. Gradually beat together powdered sugar and mixture.
*if icing is too stiff to drizzle on the cake then add a little milk while mixing.
Infinity’s Lemon Half-Pound Cake
1-1/2 c self rising flour
3 eggs
1 c granulated sugar
2 T butter, softened
1 t vanilla extract
½ box Jell-O lemon pudding
1/3 c lemon juice*
1/2 c vegetable oil
Lemon Icing
1 c plus 1 T powdered sugar
2 T whole milk
1/2 t lemon juice*
(also add a little lemon zest by taking a steak knife and scraping the peel of the lemon)
t : teaspoon
T: tablespoon
*Use the juice from 1 fresh lemon if you have it.
Preheat oven to 350°.
Use an electric mixer to blend together eggs, sugar, butter, vanilla, lemon jell-o & lemon juice in a large bowl. Add flour ½ cup at a time & blend until smooth. Add oil & mix well.
Pour ingredients into a well-greased 9x5-inch loaf pan. (or a tube bundt pan) Bake for 45 minutes or until a toothpick stuck into the center of the cake comes out clean.
Make the lemon icing by combining ingredients in a small bowl with electric
mixer on low speed. When the lemon loaf is cool, remove it from the pan &
frost the top with the lemon icing. When the icing has set up, slice the loaf into eight 1-inch-thick slices.
Makes 8 slices.
*************************************************************************
Lumpia (filipino egg rolls)
Ingredients:
•1 pound ground beef
•3/4 cup shredded carrots
•1/2 cup chopped onions
•1 teaspoon or 2 cloves minced garlic
•3/4 teaspoon pepper
•2 teaspoons season salt
•1 package of 50 Lumpia Wrappers or 2 packages of 25 individually separated Lumpia Wrappers
•1-1 1/2 cup(s) vegetable or olive oil
•Small bowl of water
First, you'll want to brown your ground beef with your chopped onions, shredded carrots, garlic, pepper, and season salt, over medium high heat in a skillet or frying pan. (I recommend using a frying pan that is at-least 1 1/2" to 2" deep. I use the same pan to fry the lumpia in once it is rolled and finished.) When the meat is nice and brown drain the excess grease and set aside.
Now, here comes the fun part. Separate the Lumpia wrappers. In all my years of making Lumpia I have not found any easy way to separate this darn things but I will tell you how I do it; maybe you can come up with an easy way. The wrappers need to be defrosted if they are frozen. You'll also want to have a plate to set them on as well as a damp kitchen towel to cover them, we don't want our wrappers to dry out! Open the package and take out the stack of Lumpia wrappers, start at the edges and gently start peeling the edges upward, continue around and round until you eventually get to the center and loosen the individual sheet off of the stack. Now, place the loose sheet on your plate under the damp towel or cloth. And basically repeat until the stack or package is done. Sounds easy right? It's not! It will take you a few times of separating before you get the hang of it, probably midway between the stack.
We are now ready to assemble our Lumpia Rolls.
•Take 1 of the Lumpia wrappers and spoon 1-2 tablespoons of your ground beef mixture into a line near the edge on the Lumpia wrapper.
•Fold Lumpia wrapper over the line of meat you just spooned.
•Now, you will begin to roll the meat into a tube. Stop rolling when you are to the middle of the wrapper.
•Fold the right and left sides of the lumpia wrapper to the center
•Continue to roll to the end of the wrapper
•Dip your fingers in the small bowl of water and lightly moisten the exposed edge of the lumpia wrapper
•Fold wrapper edge onto itself pressing it down gently. So it seems to glue itself down.
•Place to the side for now and repeat, repeat, repeat! Until there isn't anymore wrappers or meat left.
All that's left to do now is heat your oil in your frying pan on medium high heat. You only need about 1/2" of oil across the bottom of the pan. Once the oil is hot place about 4-5 Lumpia across the pan and lightly brown each side of the lumpia. About 3-5 minutes each side. It will also vary with your stove. So if it seems like they are burning quickly turn your burner down. They should be a nice golden brown color. Now you want to let them cool and drain some of the excess grease off of them. My mother and I have always used a colander, feel free just to set them on paper towels or napkins. Repeat until you've made desired amount or they are all done. You can store extras(before they are fried in oil!) in the freezer to fry later on. That's another great benefit to this recipe, you can make 50 at a time and only fry 10 one day and saved the others for when you feel like it.
Voila! You've just made Lumpia! It's okay if they're not all perfect or the same size. Over time you will learn how to make them all uniform. Trust me it took me years to master the art of Lumpia rolling.
You can use any type of dipping sauce you prefer. My choice is pain old ketchup. I know some people who like to use the store bought sweet and sour sauce and duck sauce. Some people like them plain. They are great either way. But I strongly recommend trying them with ketchup. They're a perfect pair!
*taken from http://hubpages.com/hub/Lumpia-Filipino-Egg-Rolls
It's finally over and I can say I had a wonderful holiday with loved ones as I hope you did as well.
First post of the New Year...
I'm going to repost my Fod for the Soul posts from the http://www.1081creations.com/ blog.
There are also going to be some newbies as well!
Enjoy!
Rice Broccoli & Cheese Casserole
1 Onion Diced
3 Tablespoons Butter
1 Can Cream of Chicken Soup
½ Cup of Milk
1 10oz. package of Frozen Broccoli
½ lb. Velveeta Cheese (cut in cubes)
1 ½ Cup of Cooked Rice
Sauté onion in butter, then combine with other ingredients. In a greased 1 ½ quart casserole dish bake @ 350 for 30 minutes
Christine’s Beef & Vegetable Soup
1 pound of Stew Beef Meat (beef tips)
1 can of whole kernel corn
2 cans of mixed vegetables
1 can of baby lima beans
2 cans of stewed tomatoes (garlic, basil, & oregano by DelMonte or Dole)
¼ of a small cabbage cut up
*(feel free to add any canned or frozen veggies you like but remember frozen veggies may take longer to cook than canned)
Boil beef for about 1 hour on med/high heat until tender. Season beef during this time with salt, pepper, and garlic. Turn down heat and add canned veggies, tomatoes, and cabbage and allow to cook until cabbage is done. Once cabbage is done turn off heat and allow to simmer over remaining heat. Serve while hot!
Browni Bites
Ingredients
• 1/2 cup butter
• 1 cup white sugar
• 2 eggs
• 1 teaspoon vanilla extract
• 1/3 cup unsweetened cocoa powder
• 1/2 cup self rising flour
*if you like you can add 1/2 to 1 cup of pecans, walnuts, or cashews.
DIRECTIONS
1. Preheat oven to 350 degrees F (175 degrees C). Spray an 8 inch square pan or mini muffin pan with Bakers Joy or Crisco with flour.
2. In a large saucepan, melt 1/2 cup butter. Remove from heat, and stir in sugar, eggs, and 1 teaspoon vanilla. Beat in 1/3 cup cocoa, 1/2 cup flour, salt, and baking powder. Spread batter into prepared pan.
3. Bake in preheated oven for 25 to 30 minutes. Do not overcook.
Chew Bread
1 stick butter
1 box brown sugar
2 eggs
2 c. self-rising flour
1 tsp. vanilla
1 c. chopped nuts (optional but pecans work best)
Melt butter and add sugar. Remove from heat. Add eggs, one at a time, beating after each addition. Add flour, one cup at a time. Add vanilla and nuts. Bake in 13x9x2 * inch greased pan at 350 degrees for 20-30 minutes.
Use a toothpick to test, when it comes out clean its done.
*if you want thicker bars you can use an 8x8 baking dish
Blueberry Pound Cake
1 box butter flavored yellow cake mix
1 8oz package cream cheese
1/2 cup vegetable oil
3 eggs
2 cups blueberries (add 2 Tblsp. flour)
Preheat oven to 325. Lightly grease and flour a 10" tube pan. Combine cake mix, cream cheese, oil and eggs. Beat until smooth. Gently fold lin blueberries. Spoon into cake pan and bake for about 1 hour.
Cream Cheese Icing
One 8 ounce package of cream cheese, softened
1/4 c. butter, softened
2 tsp. vanilla
1 lb. pkg. powdered sugar
Beat together cream cheese and butter until smooth. Blend in vanilla. Gradually beat together powdered sugar and mixture.
*if icing is too stiff to drizzle on the cake then add a little milk while mixing.
Infinity’s Lemon Half-Pound Cake
1-1/2 c self rising flour
3 eggs
1 c granulated sugar
2 T butter, softened
1 t vanilla extract
½ box Jell-O lemon pudding
1/3 c lemon juice*
1/2 c vegetable oil
Lemon Icing
1 c plus 1 T powdered sugar
2 T whole milk
1/2 t lemon juice*
(also add a little lemon zest by taking a steak knife and scraping the peel of the lemon)
t : teaspoon
T: tablespoon
*Use the juice from 1 fresh lemon if you have it.
Preheat oven to 350°.
Use an electric mixer to blend together eggs, sugar, butter, vanilla, lemon jell-o & lemon juice in a large bowl. Add flour ½ cup at a time & blend until smooth. Add oil & mix well.
Pour ingredients into a well-greased 9x5-inch loaf pan. (or a tube bundt pan) Bake for 45 minutes or until a toothpick stuck into the center of the cake comes out clean.
Make the lemon icing by combining ingredients in a small bowl with electric
mixer on low speed. When the lemon loaf is cool, remove it from the pan &
frost the top with the lemon icing. When the icing has set up, slice the loaf into eight 1-inch-thick slices.
Makes 8 slices.
*************************************************************************
Lumpia (filipino egg rolls)
Ingredients:
•1 pound ground beef
•3/4 cup shredded carrots
•1/2 cup chopped onions
•1 teaspoon or 2 cloves minced garlic
•3/4 teaspoon pepper
•2 teaspoons season salt
•1 package of 50 Lumpia Wrappers or 2 packages of 25 individually separated Lumpia Wrappers
•1-1 1/2 cup(s) vegetable or olive oil
•Small bowl of water
First, you'll want to brown your ground beef with your chopped onions, shredded carrots, garlic, pepper, and season salt, over medium high heat in a skillet or frying pan. (I recommend using a frying pan that is at-least 1 1/2" to 2" deep. I use the same pan to fry the lumpia in once it is rolled and finished.) When the meat is nice and brown drain the excess grease and set aside.
Now, here comes the fun part. Separate the Lumpia wrappers. In all my years of making Lumpia I have not found any easy way to separate this darn things but I will tell you how I do it; maybe you can come up with an easy way. The wrappers need to be defrosted if they are frozen. You'll also want to have a plate to set them on as well as a damp kitchen towel to cover them, we don't want our wrappers to dry out! Open the package and take out the stack of Lumpia wrappers, start at the edges and gently start peeling the edges upward, continue around and round until you eventually get to the center and loosen the individual sheet off of the stack. Now, place the loose sheet on your plate under the damp towel or cloth. And basically repeat until the stack or package is done. Sounds easy right? It's not! It will take you a few times of separating before you get the hang of it, probably midway between the stack.
We are now ready to assemble our Lumpia Rolls.
•Take 1 of the Lumpia wrappers and spoon 1-2 tablespoons of your ground beef mixture into a line near the edge on the Lumpia wrapper.
•Fold Lumpia wrapper over the line of meat you just spooned.
•Now, you will begin to roll the meat into a tube. Stop rolling when you are to the middle of the wrapper.
•Fold the right and left sides of the lumpia wrapper to the center
•Continue to roll to the end of the wrapper
•Dip your fingers in the small bowl of water and lightly moisten the exposed edge of the lumpia wrapper
•Fold wrapper edge onto itself pressing it down gently. So it seems to glue itself down.
•Place to the side for now and repeat, repeat, repeat! Until there isn't anymore wrappers or meat left.
All that's left to do now is heat your oil in your frying pan on medium high heat. You only need about 1/2" of oil across the bottom of the pan. Once the oil is hot place about 4-5 Lumpia across the pan and lightly brown each side of the lumpia. About 3-5 minutes each side. It will also vary with your stove. So if it seems like they are burning quickly turn your burner down. They should be a nice golden brown color. Now you want to let them cool and drain some of the excess grease off of them. My mother and I have always used a colander, feel free just to set them on paper towels or napkins. Repeat until you've made desired amount or they are all done. You can store extras(before they are fried in oil!) in the freezer to fry later on. That's another great benefit to this recipe, you can make 50 at a time and only fry 10 one day and saved the others for when you feel like it.
Voila! You've just made Lumpia! It's okay if they're not all perfect or the same size. Over time you will learn how to make them all uniform. Trust me it took me years to master the art of Lumpia rolling.
You can use any type of dipping sauce you prefer. My choice is pain old ketchup. I know some people who like to use the store bought sweet and sour sauce and duck sauce. Some people like them plain. They are great either way. But I strongly recommend trying them with ketchup. They're a perfect pair!
*taken from http://hubpages.com/hub/Lumpia-Filipino-Egg-Rolls
Saturday, December 19, 2009
Honey Bun Cake
Hello everyone,
Welcome to the first official post of Calla's Creations! This post is for a very special someone...
He loves Honey Bun Cake and I thought you guys might like it too!
Enjoy
Ingredients
1 box Betty Crocker® SuperMoist® yellow cake mix
2/3 cup vegetable oil
4 eggs
1 container (8 oz) sour cream (1 cup)
1 cup packed brown sugar
1/3 cup chopped pecans
2 teaspoons ground cinnamon
1 cup powdered sugar
1 tablespoon milk
1 teaspoon vanilla
Directions
1. Heat oven to 350°F. Grease with shortening and lightly flour 13x9-inch pan, or spray with baking spray with flour. (I use Baker's Joy)
2. In large bowl, beat dry cake mix, oil, eggs and sour cream with electric mixer on low speed 30 seconds, then on medium speed 2 minutes, scraping bowl occasionally. Spread half of the batter in pan.
3. In small bowl, stir together brown sugar, pecans and cinnamon; sprinkle over batter in pan. Carefully spread remaining batter evenly over pecan mixture.
4. Bake 44 to 48 minutes or until deep golden brown. In another small bowl, stir powdered sugar, milk and vanilla until thin enough to spread. Prick surface of warm cake several times with fork. Spread powdered sugar mixture over cake. Cool completely, about 1 hour. Store covered at room temperature.
Welcome to the first official post of Calla's Creations! This post is for a very special someone...
He loves Honey Bun Cake and I thought you guys might like it too!
Enjoy
Ingredients
1 box Betty Crocker® SuperMoist® yellow cake mix
2/3 cup vegetable oil
4 eggs
1 container (8 oz) sour cream (1 cup)
1 cup packed brown sugar
1/3 cup chopped pecans
2 teaspoons ground cinnamon
1 cup powdered sugar
1 tablespoon milk
1 teaspoon vanilla
Directions
1. Heat oven to 350°F. Grease with shortening and lightly flour 13x9-inch pan, or spray with baking spray with flour. (I use Baker's Joy)
2. In large bowl, beat dry cake mix, oil, eggs and sour cream with electric mixer on low speed 30 seconds, then on medium speed 2 minutes, scraping bowl occasionally. Spread half of the batter in pan.
3. In small bowl, stir together brown sugar, pecans and cinnamon; sprinkle over batter in pan. Carefully spread remaining batter evenly over pecan mixture.
4. Bake 44 to 48 minutes or until deep golden brown. In another small bowl, stir powdered sugar, milk and vanilla until thin enough to spread. Prick surface of warm cake several times with fork. Spread powdered sugar mixture over cake. Cool completely, about 1 hour. Store covered at room temperature.
Welcome
Hello all! Welcome to Calla's Creations. You all may know me from 1081creations.com from the food for the soul posts. I am very pleased to have you all visit my blog to be introduced to various goodies. This is my first blog so this is all new to me! I hope you all enjoy what I have to share and what has been shared with me!
Blessings ~Infinity~
Blessings ~Infinity~
Subscribe to:
Posts (Atom)